Whether you’re adding a brand-new vehicle or installing a device on a vehicle that already exists in the system, the installation process begins with the Installation Wizard. This tool walks you through entering the device IMEI, assigning a vehicle name, and completing the installation setup.
This article explains how to initiate the wizard in both scenarios. For a detailed explanation of the wizard steps, including IMEI input, device mounting, and verification, see: Installation Wizard: Step-by-Step Guide
Option 1: Add a New Vehicle and Install a Device
Use this flow when you’re installing a device in a vehicle that is not yet listed in your fleet.
Steps:
Navigate to the Vehicles page.
Click the “Add Vehicle & Install” button in the top-right corner.

The Installation Wizard will launch automatically.
Option 2: Install a Device on an Existing Vehicle
Use this flow when the vehicle is already added to your fleet, but a device hasn’t been installed yet — or you are replacing an old device.
Steps:
Navigate to the Vehicles page.
Locate the vehicle you want to install the device on.
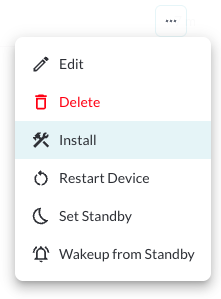
Click the three-dot menu (⋮) on the right side of the vehicle’s row.
Select “Install” from the dropdown menu.
The Installation Wizard will launch.
Note
Once the device is powered on and connected to the cloud, it will be automatically
activated and begin reporting data to the system.