The Vehicles page is designed to help you oversee and control your fleet with ease. From viewing vehicle information to managing device settings, this page provides all the tools you need.

Assets Details
The table displays all the fleet's vehicles, allowing you to efficiently organize and access vehicle details. It supports downloading, sorting, filtering, resizing columns, and other customization options. For a complete guide, refer to the article How to Use Table Options.
The table includes the following columns, each providing specific vehicle information:
| Name |
The vehicles name |
| IMEI |
The 15-digit IMEI number of the assigned RZ1 |
| Type |
The device type (e.g., RZ1, AD21) |
| License Plate |
The vehicle's registered license plate number |
| Device Status |
Displays the current operational status of the vehicle's device (e.g., Active, Standby, Not Connected) |
| Custom Settings |
Shows a Yes/No flag to indicate if a vehicle has settings that override the fleet defaults |
| Assigned Driver |
Shows the name of the driver currently assigned to the vehicle |
Checked-In Driver |
Displays the driver currently checked in to the vehicle |
| Last Seen |
Indicates the last time the vehicle's device communicated with the system |
| VIN |
The vehicle's Identification Number. (M) indicates the VIN was manually assigned via the Set VIN option. |
| Odometer |
The current odometer reading of the vehicle as reported by the device. |
| Engine Hours |
The total engine hours recorded for the vehicle as reported by the device. |
| Firmware |
The firmware version of the assigned RZ1 |
| Tags |
Custom tags that help categorize and group vehicles. Tags can be added and managed in the Settings Page. For more details on how to create and assign new tags, refer to the article Tags Settings. |
Refresher Widget
Keep your data up to date by using the Refresher Widget. This allows you to reload the table data and ensure you’re viewing the latest information. For more information, refer to the article How to Use the Refresher Widget.
Adding New Vehicles
The Vehicles page offers an efficient way to grow your fleet by adding new vehicles. For a step-by-step guide on adding and configuring vehicles, refer to the article How to Add New Vehicles. You can also add a vehicle and initiate its installation, learn how in the article How to Initiate the Installation Process.
Quick Action Menu
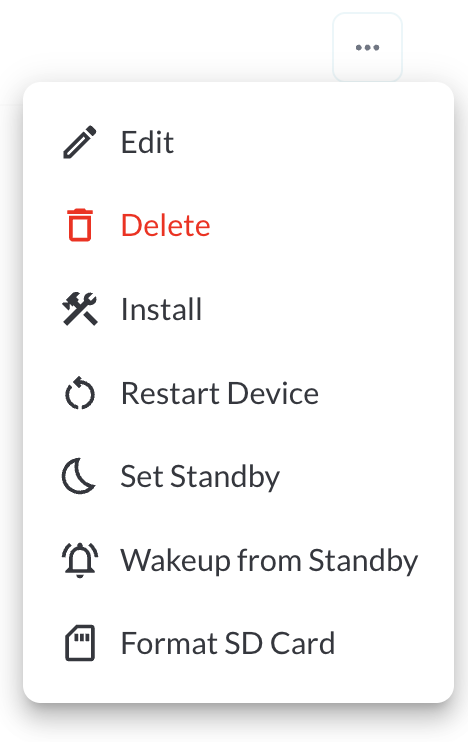
1. Edit a Vehicle
Opens an interface where you can configure the device and safety settings for the selected vehicle. For details, see the article Understanding Vehicle Device and Safety Settings.
2. Delete a Vehicle
Permanently removes the selected vehicle from your fleet, once deleted, all associated data will no longer be accessible in the system.
Warning
Deleting a vehicle is a permanent action and cannot be undone.
3. Install
Opens the installation flow to begin setting up the device for this vehicle. For more details, read the How to Initiate the Installation Process article.
4. Restart the Device
This option sends a command to reboot the vehicle's associated device. Restarting the device can help resolve temporary communication or performance issues. It ensures the device operates smoothly without requiring manual intervention on-site.
5. Set Device to Standby
This feature allows you to place the vehicle's device into a low-power standby mode.
6. Wake Up the Device
This option powers up a device that has been placed in standby mode. It sends a wake-up command.
7. Format SD Card
This option allows you to remotely format the SD card inserted in the device. Formatting the SD card will erase all recorded footage and stored data—use this option to clear space or prepare the card for new recordings.
Warning
Formatting the SD card will erase all existing data. This action cannot
be
undone.
8. Set VIN
Manually assign a 17-character Vehicle Identification Number (VIN) to the vehicle. Once a VIN is set, the device-reported VIN will be ignored. The platform decodes the VIN automatically and displays the vehicle Make and Year upon entry. If an invalid VIN is entered, the message "VIN check digit appears invalid — please double-check" will appear.
Custom Report Widget
Save time by using the Custom Report Widget to store report configurations with your selected filters, columns, sorting, and grouping. This allows you to quickly return to commonly used report setups and set a default configuration for easy access. For more information, read the article How to Use the Custom Report Widget.