The Scheduled Reports feature allows you to set up automatic report deliveries on a recurring basis. Once configured, reports are generated and sent to the selected recipients at the defined frequency — without any manual action required.
Scheduled Reports Tabs
Configured Tab

The Configured tab displays all scheduled reports that have been set up. The table includes the following columns:
| Name | The name assigned to the scheduled report |
| Kind | The type of schedule |
| Report | The report type being delivered (e.g., Trip Report) |
| Date Range | The date range the report covers each time it is generated (e.g., Last 7 days) |
| Frequency | How often the report is sent and at what time (e.g., Weekly — Tuesday at 7:30 PM) |
| Format | The file format of the delivered report (CSV or XLSX) |
| Next Run | The date and time of the next scheduled delivery |
| Active | Toggle to enable or disable the scheduled report without deleting it |
Triggered Tab

The Triggered tab provides a log of all past report deliveries. Use this view to verify that reports were sent successfully and to download previously generated files. The table includes the following columns:
| Schedule | The name of the scheduled report that was triggered |
| Report | The report type that was generated |
| Run At | The date and time the report was generated and sent |
| Status | The delivery status of the report (e.g., Success, Failed) |
| Files | A download link for the generated report file |
How to Create a Scheduled Report
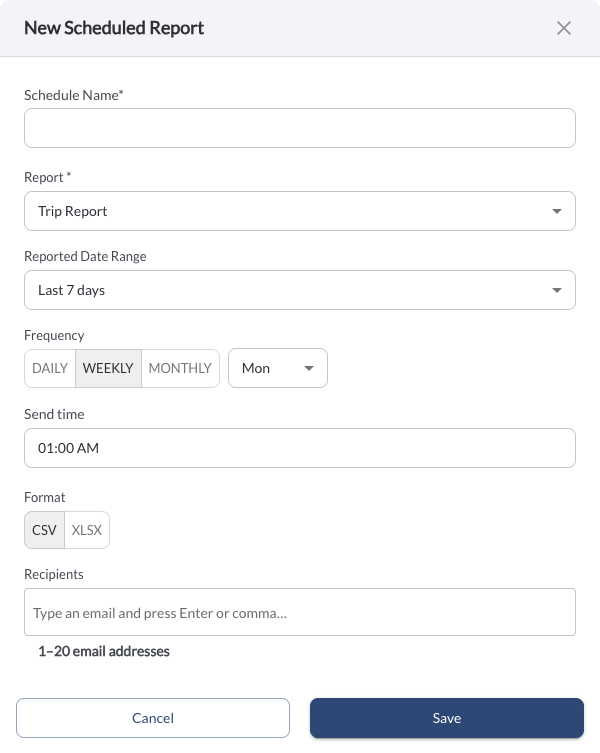
From the Scheduled Reports Page
- Navigate to Reports in the side menu and click Scheduled Reports.
- Click + New Schedule.
Fill in the following fields:
| Schedule Name | A name to identify this scheduled report |
| Report | Select the report type to be delivered (e.g., Trip Report) |
| Reported Date Range | The date range the report should cover each time it is generated (e.g., Last 7 days) |
| Frequency | How often the report should be sent — Daily, Weekly, or Monthly. For Weekly, select the day of the week. For Monthly, select the day of the month |
| Send Time | The time of day the report should be delivered |
| Format | Select the file format for the report — CSV or XLSX |
| Recipients | Enter up to 20 email addresses to receive the report. Type an email and press Enter or comma to add each recipient |
- Click Save. The scheduled report will now appear in the Scheduled Reports list and will be delivered automatically at the configured time.
How to Edit or Delete a Scheduled Report
- Navigate to Reports in the side menu and click Scheduled Reports.
- Click the (⋯) menu next to the scheduled report you want to update.
- Select Edit to modify the schedule configuration.
- Select Delete to permanently remove the scheduled report.
Warning
Deleting a scheduled report is a permanent action and cannot be undone.