The RoadEazy RZ1 system is designed for a quick and reliable installation process. In this step, you’ll mount the RZ1 Vehicle Hub, connect it to the vehicle’s diagnostic port, and install the camera.
Install with OBD-II (Light-Duty Vehicles)
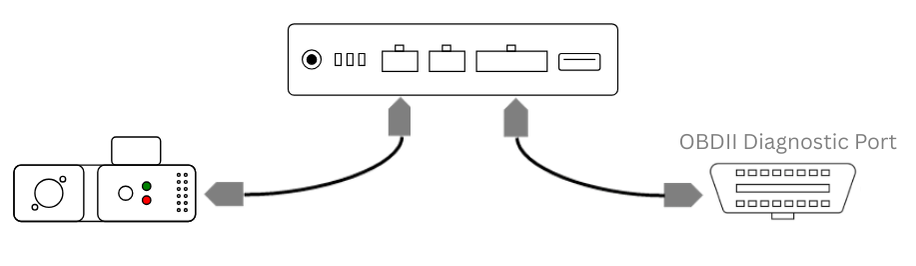
Locate the OBD-II Port - Typically found beneath the dashboard near the driver’s side, close to the steering column.
Connect the Hub - Plug the provided OBD-II power cable into the port, and connect the other end to the PWR/OBD port on the RZ1 Hub.
-
Secure the Hub - Place the RZ1 Vehicle Hub underneath the dashboard or behind the diagnostic port, ensuring it is securely mounted and does not obstruct vehicle operations.
Note
Ensure the device is placed under the dash in a well‑ventilated
area.
Do not block or cover the air vents on the device, as proper
airflow is required for safe and reliable operation.
Organize Cables - Route the cables neatly to prevent interference with pedals, vehicle controls, or the driver. Use the included zip ties or cable clips for secure cable organization.
Check Power - The green power LED on the hub should light up to confirm a successful connection.
Next: Activate the Device - Once the hub is physically installed and powered, continue to Step 3: Activate, Verify, Complete to finish the setup process.
Install with J1939 (Medium & Heavy-Duty Vehicles)
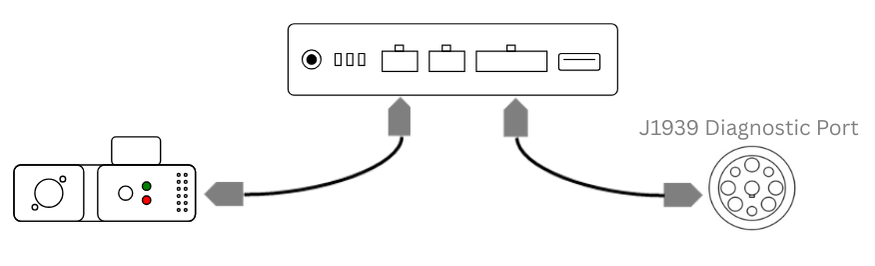
Locate the J1939 Port - Look for a round 9-pin Deutsch connector, usually found beneath the dash or near the driver’s seat.
Connect the Hub - Plug the J1939 cable directly into the diagnostic port. Connect the other end to the PWR/OBD port on the RZ1 Vehicle Hub.
-
Mount the Hub Securely - Fasten the RZ1 hub in a safe, hidden location under the dash. Avoid areas that may heat up or shift during driving.
Note
Ensure the device is placed under the dash in a well‑ventilated
area.
Do not block or cover the air vents on the device, as proper
airflow is required for safe and reliable operation.
Secure the Hub - Place the RZ1 Vehicle Hub underneath the dashboard or behind the diagnostic port, ensuring it is securely mounted and does not obstruct vehicle operations.
Organize Cables - Route the cables neatly to prevent interference with pedals, vehicle controls, or the driver. Use the included zip ties or cable clips for secure cable organization.
Check Power - The green power LED on the hub should light up to confirm a successful connection.
Next: Activate the Device - Once the hub is physically installed and powered, continue to Step 3: Activate, Verify, Complete to finish the setup process.

Warning
If at any point after an in-vehicle device is installed a warning lights up on the vehicle dash or the vehicle stalls or has a marked drop in performance, shut off the engine, remove the device, and contact your reseller. Continuing to operate a vehicle with these symptoms can cause loss of vehicle control, and serious injury.

Tip
Ensure that all cables and components are positioned securely and do not obstruct the driver’s space or interfere with vehicle operation.
Install the RZ1 with Constant Power
To wire the RZ1 hub directly to a constant 12V source, follow the steps in the guide: Install with Hardwire 2-Wire Kit (Constant Power).
Wiring the RZ1 for Ignition Detection
The RZ1 can be wired to detect ignition ON/OFF for accurate trip logging, engine runtime monitoring, and event detection. For full instructions, see Wiring the RZ1 for Ignition Detection.
Mount the Camera
-
Select the Mounting Location - Position the camera on the windshield below the rearview mirror and above the windshield sweep area. Ensure the camera has a clear view of the road ahead and the vehicle cabin.
-
Prepare the Surface - Clean the windshield thoroughly using the provided alcohol wipe to ensure proper adhesion of the 3M mounting pad.
-
Secure the Camera - Peel off the protective backing from the 3M mounting pad and press the camera firmly against the windshield. Hold it in place for a few seconds to ensure a strong bond.
-
Adjust the Camera Angle - Use the included safety screwdriver to unlock the camera and adjust its road-facing and cabin-facing angles. Tighten the locking screw once the desired positions are set.
-
Route the Camera Cable - Run the cable from the camera along the top edge of the windshield. Use the included cable clips or tuck the cable under the glass seal to secure it neatly.
-
Connect to the RZ1 Vehicle Hub - Attach the camera cable to the CAM port on the RZ1 Vehicle Hub.
-
Verify Operation - Check the status LED on the camera to ensure it is powered on and operational.

Note
Make sure to remove all blue protective stickers from the camera lenses. Leaving the stickers on will impact video quality and may obstruct the camera’s view.
Warning
It is crucial to read all instructions and safety information thoroughly before installing or operating this device. Ignoring these guidelines may lead to property damage, personal injury, or non-compliance with local laws. For detailed guidance, refer to the article Safety, and Maintenance Guidelines.